Installation
PiRogue supports three operating modes, depending on your needs. Pick the setup that matches your hardware below.
The newer version (>=2.x) has implemented significant changes to the dashboard and WiFi configuration, resulting in compatibility issues with previous setups. To know the version of your PiRogue, simply check the version of the package pirogue-base.
$ dpkg -l | grep pirogue-base
ii  pirogue-base    2.0.3    all    Install all PiRogue packages
See below the default configuration depending on the version of your PiRogue:
- PiRogue version 2.x
- PiRogue version 1.x
In this version of PiRogue, the passphrase of the WiFi access-point and the password of the dashboard are randomly generated during the installation.
On your PiRogue:
- the command
pirogue-admin-client wifi get-configurationwill give you the passphrase of the WiFi - the command
pirogue-admin-client dashboard get-configurationwill give you the password of the dashboard for the useradmin
The dashboard is accessible on https://pirogue.local/dashboard.
You have to trust the default self-signed certificate.
If you want to change the passwords, please refer to the configuration documentation.
In this version of PiRogue:
- the default passphrase of the WiFi is
superlongkey - the default password of the dashboard for the user
adminisPiRogue
The dashboard is accessible on http://pirogue.local:3000.
If you want to change the passwords, please refer to the configuration documentation.
Operating modes
The three operating modes are shown in the image below.
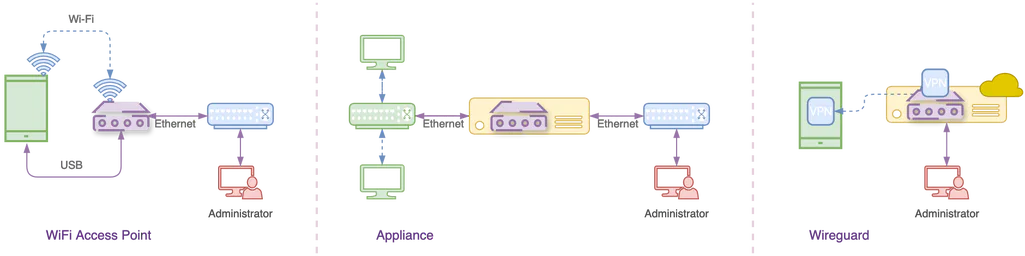
Choose your setup
- Setup PiRogue on RPI
- Setup PiRogue on a Computer
- Setup PiRogue as a VPN
PiRogue tool suite (PTS) is an open-source tool suite that provides a comprehensive mobile forensics and network traffic analysis platform targeting mobile devices both Android and iOS, internet of things devices, and in general any devices using WiFi to connect to the Internet.
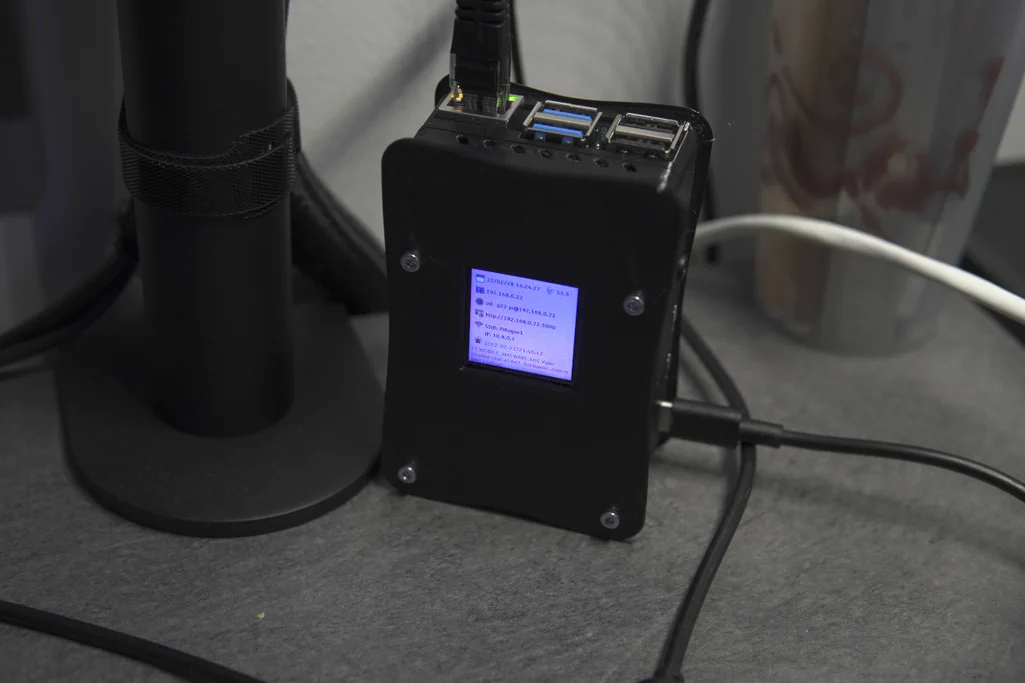
This guide explains how to install PiRogue on a Raspberry Pi. To learn how to install PiRogue in other configurations, refer to the installation documentation.
Main PiRogue capabilities
The PiRogue is an open hardware device based on a Raspberry Pi operating as a network router (like any ISP router) analyzing network traffic in real time.
It can operate in different modes:
-
an on-the-field mode
- for emergency response (active spying, device tampering, ...) useful for responders in repressive environment
- conduct forensics analysis and network detection using a pre-installed set of tools
-
an expert mode for technical people to:
- determine the list of collected data
- assess regulatory compliance
- conduct penetration testing
- analyze malware's behavior
- ensure reproducible analysis
- generate comprehensive reports
The hardware you need
In addition to a computer and an Internet connection, you will need, at least, a Raspberry Pi (+ its power supply), a micro SD-card and an ethernet cable.
Pick a Raspberry Pi
First, you need a Raspberry Pi. We support the following versions of Raspberry Pi:
- Raspberry Pi 3 Model B 1
- Raspberry Pi 3 Model B+ 1
- Raspberry Pi 4 Model B - 1GB 1
- Raspberry Pi 4 Model B - 2GB 1
- Raspberry Pi 4 Model B - 4GB
- Raspberry Pi 4 Model B - 8GB
- Raspberry Pi 5 (Experimental Support) 2
1 Not all services such as Suricata can be run on these devices due to limited memory.
2 We are actively developing Raspberry Pi 5 support. Download the experimental PiRogue OS version for Raspberry Pi 5 from our download page.
If you want to buy a Raspberry Pi, visit the rpilocator website to check for availability.
Be sure to have an appropriate power supply for your PiRogue. If you don't know what to choose, pick the official Raspberry Pi power supply.
Raspberry Pi devices have slower, more power-efficient processors, limited memory, and limited onboard WiFi throughput compared to conventional computers. These limitations can potentially affect their performance when running demanding tasks. Due to the limited performance of Raspberry Pi devices, we recommend using PiRogue with up to 2-3 devices connected to the Wi-Fi access point simultaneously.
Suricata, the Intrusion Detection System (IDS) and network security monitoring engine, requires significant system resources. It needs enough memory to hold rules and process large volumes of network packets. To conserve resources on devices with limited RAM, Suricata is automatically disabled on systems with less than 2.5GB of RAM. This limitation is set in the file /etc/systemd/system/suricata.service.d/override.conf.
Pick a micro SD-card
Secondly, you need a SD-card to run your PiRogue. The SD-card has to be large enough to store the operating system and all the data generated by the PiRogue itself. By default, it stores 5 days of network traffic history.
You may choose:
- a 32GB micro SD-card for regular use
- a 64GB micro SD-card if you plan doing long runs, analyzing the traffic of multiple devices simultaneously
For a faster booting experience and improved disk write performance, invest in a high-quality micro SD-card from a reputable brand. Look for one with Application Performance Class 1 (A1) and Speed Class 10.
Pick an Ethernet cable
In order to connect the PiRogue to the Internet, you should have an ethernet cable connecting your PiRogue to your network. A simple cat. 5 ethernet cable will do the job.
Optional stuff
Depending on your needs, you would want to add a hat to your PiRogue and protect everything with a case. Check the documentation for more details.
If you don't feel comfortable with building the case or the hat, feel free to buy one by reaching out to us.
Install PiRogue OS
Get PiRogue OS
PiRogue OS is periodically released. The OS is pre-configured so you just need to flash it on a micro SD-card. The image (the binary file to be flashed on the SD-card) is compressed. The file you have to download on your computer has a name following this schema
PiRogue-OS-<Debian major version>-<supported hardware>-<year>-<month>-<day>.img.xz.
Download the latest version of PiRogue OS →
Check the integrity of the image
Once you have downloaded the image, you can check its integrity (check if the file has not been modified or corrupted) by comparing its SHA256 and the SHA256 displayed on the GitHub page. If both SHA256 are the same, the file you downloaded has not been tampered.
To compute the SHA256 of the file you downloaded, run the following command in a terminal:
- Linux
- Windows
- OSX
sha256sum [image file name].img.xz
Get-FileHash .\[image file name].img.xz -Algorithm SHA256 | Format-List
shasum -a 256 [image file name].img.xz
Replace [image file name].img.xz with the image file you just downloaded.
Set up your SD card
Advanced Linux users can use a combination of xz and dd commands to flash their SD-card.
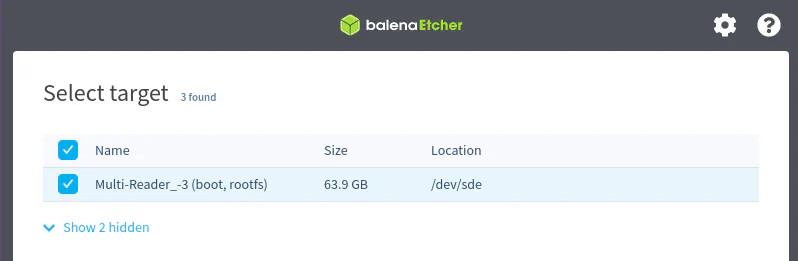
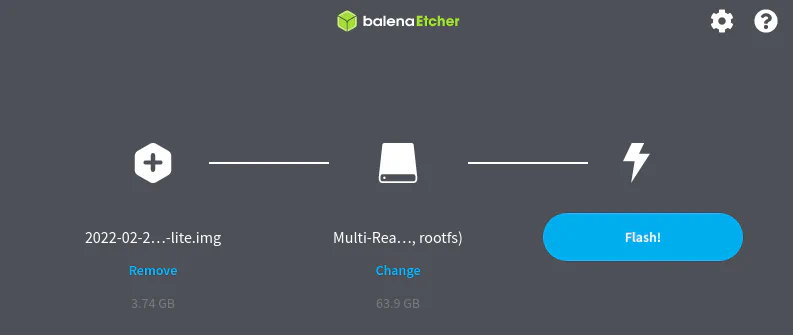
We recommend downloading and installing Balena Etcher on your computer. Run Balena Etcher as administrator. This software allows you to flash compressed images; however, if you encounter any difficulties, uncompress the image file before flashing.
Please follow the steps outlined in the screenshots below for successful completion.
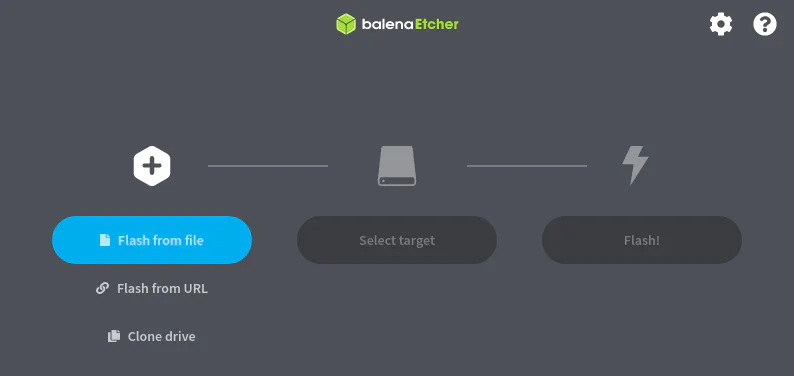
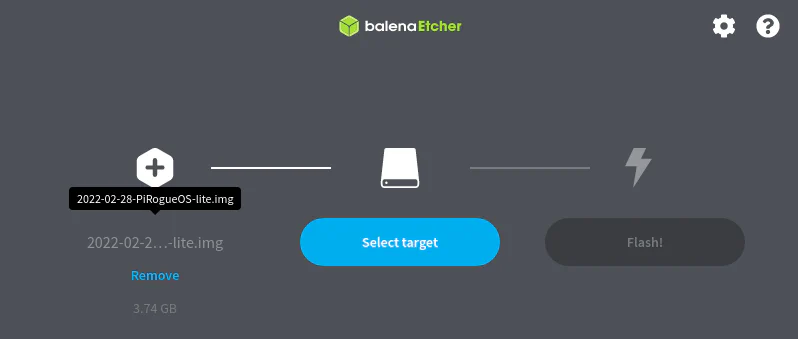
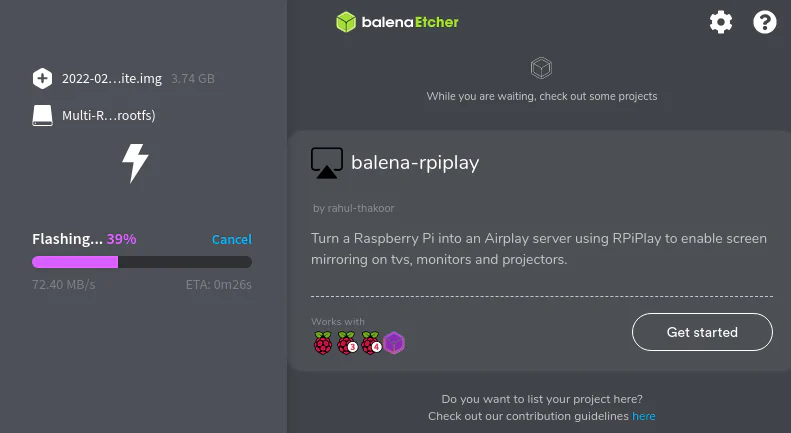

Once the flashing is complete, eject the SD-card from your computer.
Set up the PiRogue
If you have the hat for your PiRogue, it is the good time for you to plug it in and put everything into the case. Insert your freshly flashed micro SD-card into the PiRogue, plug the ethernet cable to the PiRogue. Remember, this cable connects your PiRogue directly (or through network switch) to your ISP router.
To operate properly, your PiRogue needs to have Internet access.
First boot
First, check that the SD card is correctly inserted into the appropriate slot of your PiRogue and the ethernet cable is properly connected. Then, plug the power supply. Wait a few minutes before trying to access your PiRogue.
Now, connect to your PiRogue using SSH.
ssh pi@pirogue.local
Type raspberry which is the default password of the user pi and press Enter.
Once connected, you have to finalize the installation of your PiRogue.
Firsly, you'll be asked to change the Unix password, the new password you've set replaces the default one. Once you have change the Unix, you must reconnect to your PiRogue with SSH.
Secondly, you have to install PiRogue packages and features. To do so, you need to run the following commands on your PiRogue. Copy and execute each command separately one by one:
| Command Line | Description |
|---|---|
sudo apt update | Gets the latest versions of the available packages |
sudo apt dist-upgrade -y | Upgrade the entire operating system and all additional installed software |
sudo apt install pirogue-base -y | Install the PiRogue packages and features |
sudo reboot | Reboot the PiRogue |
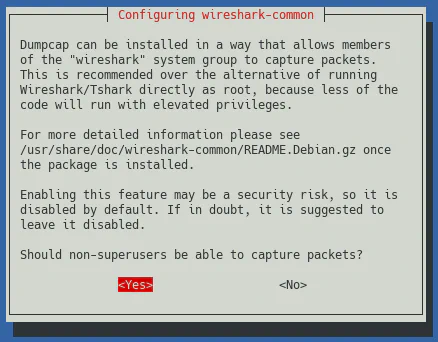
During the installation, if asked, you will have to answer:
Noto save firewall rules for IP v4Noto save firewall rules for IP v6Yesto allow non-root users to capture network traffic
If you're setting up the PiRogue in the context of an organization at your office or your lab you will have to enforce your internal security policies and guidelines. At least, change your password using the passwd command.
After the reboot, wait a few minutes, you will then be able to connect a Wi-Fi device and use the PiRogue’s dashboard.
The telemetry is enabled by default but you can easily opt out. Find more details in the section dedicated to the telemetry.
Default passwords
Before connecting a device to the WiFi access point of the PiRogue or opening the dashboard, you have to determine what version of PiRogue you are using. To do so,
run the following command on your PiRogue. The version of your PiRogue corresponds to the version of the package pirogue-base.
$ dpkg -l | grep pirogue-base
ii  pirogue-base    2.0.2    all    Install all PiRogue packages
- PiRogue version 2.x
- PiRogue version 1.x
In this version of PiRogue, the passphrase of the WiFi access-point and the password of the dashboard are randomly generated during the installation.
On your PiRogue
- the command
pirogue-admin-client wifi get-configurationwill give you the passphrase of the WiFi - the command
pirogue-admin-client dashboard get-configurationwill give you the password of the dashboard for the useradmin
The dashboard is accessible on https://pirogue.local/dashboard.
You have to trust the default self-signed certificate.
If you want to change the passwords, please refer to the configuration documentation.
In this version of PiRogue:
- the default passphrase of the WiFi is
superlongkey - the default password of the dashboard for the user
adminisPiRogue
The dashboard is accessible on http://pirogue.local:3000.
If you want to change the passwords, please refer to the configuration documentation.
It will take around 4 minutes before network flows start appearing in the dashboard. At the first start of your PiRogue the dashboard will look empty or broken. Don't worry, connect a device to the PiRogue's WiFi network, wait 5 minutes and refresh the dashboard by pressing F5 key on your keyboard.
Once your PiRogue is running, it will be accessible to you from the network. There are 2 ways to get the IP address of your PiRogue.
The first way is by looking at the screen of the PiRogue Hat.
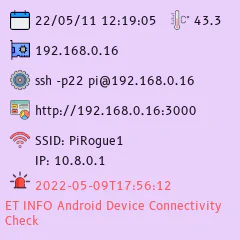
The second way is to use the ping command. To do so, on your computer connected to the same network as your PiRogue, run the following command:
ping -c1 pirogue.local
What's next
Your PiRogue analyzes the traffic of every connected device automatically:
- Read the results: Dashboard
- Understand what is analyzed: Network traffic analysis
- Record the traffic: Capture network traffic
The PiRogue ecosystem has been extended to cover more use cases, and it's now possible to deploy it on a machine featuring two interfaces. The requirements are the following:
- a Debian 12 installation on a physical or virtual machine;
- using the
amd64orarm64architecture; - with at least 4GB of RAM and 40GB of disk;
- an initial network configuration allowing internet access.
The operating mode is selected automatically during the initial installation, based on the available interfaces. Let's have a look at the logic:
- The external interface is determined by checking which interface is used to access some IP on the internet.
- If there's another interface that is tagged as a Wi-Fi one, then the “Access Point” mode is selected, and that interface is used for the isolated network.
- Otherwise, if there's another interface that is tagged as an Ethernet one, then the “Appliance” mode is used, and that interface is used for the isolated network.
- Finally, if there was only a single interface (meaning the requirements documented above weren't met in the first place), a fallback to “VPN” mode occurs. This mode is quite different, and is actually documented in the following section.
Installation steps can be split into 2 phases: making sure the system is up-to-date to start with (this isn't specific to the PiRogue ecosystem), then configuring the PiRogue PPA and installing PiRogue packages.
sudo apt-get update
sudo apt-get dist-upgrade
sudo apt-get install wget
sudo wget -O /etc/apt/sources.list.d/pirogue.list https://pts-project.org/debian-12/pirogue.list
sudo wget -O /etc/apt/trusted.gpg.d/pirogue.gpg   https://pts-project.org/debian-12/pirogue.gpg
sudo apt-get update
sudo apt-get install pirogue-base
During the installation, if prompted, you will have to answer:
Yesto allow non-superusers to capture network traffic.
Afterwards, the complete configuration can be inspected using the following
command (no need to be root):
pirogue-admin-client system get-configuration
Important variables:
SYSTEM_OPERATING_MODEconfirms the operating mode.DASHBOARD_PASSWORDis the password for the dashboard, generated during the install.WIFI_PASSPHRASEis the passphrase used for the Wi-Fi network, when operating in “access point” mode, also generated during the install.EXTERNAL_ADDRESSandSYSTEM_HOSTNAMEis where the dashboard is exposed,
it's accessible at https://EXTERNAL_ADDRESS/dashboard
or https://SYSTEM_HOSTNAME.local/dashboard.
In both cases, unless you enable public external access, you have to trust the default self-signed certificate.
See Configuration for instructions on how to change those generated secrets.
The main difference between “access point” and “appliance” modes is how the
connectivity is provided on the isolated network (with or without hostapd to
manage the Wi-Fi network).
The PiRogue ecosystem has also been extended to support another operating mode, where a server is made accessible over the internet, offering VPN connectivity. A typical installation would be a dedicated server or a VPS, with a single interface exposed on the internet.
The requirements are the same as in the previous section:
- a Debian 12 installation on a physical or virtual machine;
- using the
amd64orarm64architecture; - with at least 4GB of RAM and 40GB of disk;
- an initial network configuration allowing internet access.
With such a configuration, VPN is automatically selected as the operating mode, and WireGuard is set up automatically.
The initial installation steps are the same as in the previous section:
sudo apt-get update
sudo apt-get dist-upgrade
sudo apt-get install wget
sudo wget -O /etc/apt/sources.list.d/pirogue.list https://pts-project.org/debian-12/pirogue.list
sudo wget -O /etc/apt/trusted.gpg.d/pirogue.gpg   https://pts-project.org/debian-12/pirogue.gpg
sudo apt-get update
sudo apt-get install pirogue-base
During the installation, if prompted, you will have to answer:
Yesto allow non-superusers to capture network traffic.
Afterwards, the complete configuration can be inspected using the following
command (no need to be root):
pirogue-admin-client system get-configuration
There are two big differences though:
- Since the server is accessible from the internet, we want to secure the dashboard access with a TLS layer.
- We need to create WireGuard peers, and configure the VPN on e.g. phones to be analyzed.
Here, we assume:
- a DNS record exists already, pointing to the public IP address of the PiRogue.
- port
80and443from your public IP address fully translate to your PiRogue respective ports
Requesting a certificate and adjusting the web server configuration can be done this way:
pirogue-admin-client external-network enable-public-access --domain pirogue.example.org --email contact@example.org
The dashboard is available at https://pirogue.example.org/dashboard afterwards.
To create a VPN peer, run the following commands, then scan the QR code using the WireGuard application on the phone, and enable the VPN:
pirogue-admin-client vpn add-peer
pirogue-admin-client vpn get-peer-config 2 | qrencode -t ANSIUTF8